Saturday 31 December 2016

Teamcenter : Data Exchange

Here we will understand terminology related to Data exchange

Data can be exchanged using following method

1) PLM XML /TC XML Export IMPORT
      To understand the PLM XML please visit the link

2) Briefcase Browser

Let's discuss about Briefcase Browser

Briefcase Browser is a stand-alone application.

Supplier sites without Teamcenter access (unmanaged suppliers) can use Briefcase Browser to work with Teamcenter briefcase files. A briefcase file is a compressed file that contains Teamcenter-required TC XML formatted data and the associated binary CAD and JT files that create a valid Teamcenter product structure. This allows you to exchange product data containing computer aided design (CAD) and JT files, with their associated metadata, with sites that use Teamcenter to manage their product data. 

Briefcase Browser is a stand-alone application that can:
• Read and display unmanaged briefcase files. Only datasets attached   to item revisions are displayed.
• Open JT files in JT2Go or Teamcenter lifecycle visualization (top   assembly supplied in briefcase file from a Teamcenter site only).
• Open CAD data in NX. Other CAD tools may be supported in the    future.
• Display a warning when a briefcase file is not CAD complete. A      briefcase file is CAD complete if all or none of the item revisions  are associated with a UGMASTER dataset type and the UGMASTER type  has not been modified in Teamcenter.

Friday 30 December 2016

PLM XML/TC XML Export Import Administration : Basic Understanding

[Statements are taken from PLM XML/ TC XML Export Import Administration PDF]

PLMXML for a standard PLM XML import or export i.e Between Teamcneter Unified sites and non Teamcenter sites

TC XML if you are using Data Exchange to move data between Teamcenter and Teamcenter Enterprise sites.

Transfer mode objects are created in PLM XML/TC XML Export Import Administration and are displayed as options when users import or export objects or system data using one of the Teamcenter applications. 
They allow users to export and import data with little knowledge other than the name of the transfer mode object that they should use; for example, ToCompanyA, FromCompanyB,
or ToCompanyB.

Transfer mode objects are made up of the following items that configure the import or export operation.
Closure rules
Define the scope of the data translation.
Filter rules
Use conditions to apply a finer level of control over which data gets translated
along with the primary objects.
Action rules
Sets of methods that can be called before, during, and after the translation.
Property sets
Provide a mechanism for PLM XML objects to have arbitrary properties in the form of UserData elements.

Managing closure rules
Closure rules control the scope of the data translation on both input and output.
They specify how the data structure is traversed by specifying which relationships are of interest and what should be done when these relationships are encountered.
Closure rules are comprised of five parts: primary object selector, secondary object selector, relation selector, action, and an optional conditional clause. Closure rules generally come in sets. The closure rule clauses are evaluated in order for each target object. The first applicable rule determines the disposition of the related object.

A rule is applicable only if the target object fits the primary selector, the secondary object fits the secondary selector, the relationship between the two objects fits the relationship selector, and the conditional clause evaluates to TRUE. The action
of the applicable closure rule clause determines how the translator handles the secondary object.

If no rule applies, the object is skipped. If the action is TRAVERSE, the object becomes another target of the translation. If the action is PROCESS, the secondary object is written (into either PLM XML or the Teamcenter database), but no closure rule clauses are applied to the secondary object’s related objects. If the action is
SKIP, nothing is done with the object.

IMPORT EXPORT ITK API Sample refer link

Teamcenter ITK : BOM EXPORT WITH PLM XML

Problem Statement :Use ITK and PLM XML export to export BOM

The following example shows how to use ITK to export a BOM view revision
PLM XML: Code Taken from server customization guide PDF

#include <stdlib.h>
#include <tc/tc.h>
#include <tc/emh.h>
#include <tccore/item.h>
#include <itk/mem.h>
#include <pie/pie.h>
#include <bom/bom.h>
#define SampleError 1
#define EXIT_FAILURE 1
#define ERROR_CHECK(x) { \

int stat; \
char *err_string; \
if( (stat = (x)) != ITK_ok) \
{ \
EMH_get_error_string (NULLTAG, stat, &err_string); \
printf ("ERROR: %d ERROR MSG: %s.\n", stat, err_string); \
printf ("FUNCTION: %s\nFILE: %s LINE: %d\n",#x, __FILE__, __LINE__); \
if(err_string) MEM_free(err_string); \
exit (EXIT_FAILURE); \
} \
}

int ITK_user_main(int argc, char* argv[]);
static void initialize ( char *usr , char *upw , char *ugp);
static void display_help_message(void);
static int find_topline_of_itemid(char *itemid,char *rev, int *n_tags, tag_t **tags);
static int export_bvr();
/* Main */

int ITK_user_main(int argc, char* argv[])
{

int status = 0;
if ( argc <= 6 )
{

display_help_message();
return( SampleError);
}
char *usr = ITK_ask_cli_argument( "-u=");
char *upw = ITK_ask_cli_argument( "-p=");
char *ugp = ITK_ask_cli_argument( "-g=");
initialize ( usr , upw , ugp );
ITK_set_journalling(TRUE);
export_bvr();
ITK_exit_module(TRUE);
return status;
}

/* Do BVR export */

static int export_bvr()
{

int max_char_size = 80;
char *xmlFileName;
char *logFileName = (char *) MEM_alloc(max_char_size * sizeof(char));
char *itemid;
char *rev;

int n_objects = 0;

tag_t *objects = NULL;

// Create PIE session
tag_t session;
ERROR_CHECK( PIE_create_session(&session) );

if ( (xmlFileName = ITK_ask_cli_argument( "-file=" )) == NULL )
{
display_help_message();

return ( SampleError );
}

// Set the name of the XML file to export
ERROR_CHECK( PIE_session_set_file(session, xmlFileName) );

// Set the name of the log file
sprintf(logFileName, "%s.log", xmlFileName);
ERROR_CHECK( PIE_session_set_log_file(session, logFileName) );

// get item id
if ( (itemid = ITK_ask_cli_argument( "-item=" )) == NULL )
{
display_help_message();

return ( SampleError );
}

// Get item revision
if ( (rev = ITK_ask_cli_argument( "-rev=" )) == NULL )
{
display_help_message();
return ( SampleError );
}

// Get tranfermode
int n_transfer_modes;
tag_t *transfer_modes;
ERROR_CHECK( PIE_find_transfer_mode("ConfiguredDataExportDefault", "", &n_transfer_modes,

&transfer_modes) );
if( n_transfer_modes == 0 )
{

printf("Error in finding default transfer mode\n");
return(SampleError);
}

// Set the transfermode on the sessionion
ERROR_CHECK( PIE_session_set_transfer_mode(session, transfer_modes[0]) );
//To export the translations of a localizable properties, call PIE__set_export_languages
// with the language codes that you are interested in to set the locales to PIE Session.
// Get the topline of this item to export
ERROR_CHECK( find_topline_of_itemid(itemid, rev, &n_objects, &objects) ) ;

// Pass in the list of objects and do the export
ERROR_CHECK( PIE_session_export_objects(session, n_objects, objects) );

// Delete the session
ERROR_CHECK( PIE_delete_session(session) );

MEM_free(logFileName);
return( ITK_ok );
}

/* Login */

static void initialize ( char *usr , char *upw , char *ugp)
{

int status = ITK_ok;
char *message;
ITK_initialize_text_services( 0 );
if ( ITK_ask_cli_argument( "-h" ) != 0 )
{
display_help_message();
exit( EXIT_FAILURE );
}

status = ITK_init_module ( usr , upw , ugp );
if (status != ITK_ok)
{
EMH_ask_error_text (status, &message);
printf("Error with ITK_auto_login: \"%d\", \"%s\"\n", status, message);
MEM_free(message);
return ;
}
else
{
printf ("login to database successful.\n");
}
}

/* Find topline for this item */

static int find_topline_of_itemid(char *itemid,char *rev, int *n_tags, tag_t **tags)
{
tag_t itemTag = NULLTAG;
tag_t rev_tag = NULLTAG;

int local_num_tags = 0;

tag_t *local_tags = NULL;

// Find the required item //API Deprecated
ERROR_CHECK( ITEM_find_item (itemid, &itemTag) );

if(itemTag == NULLTAG)
{
return(SampleError);
}

//Export only if rev is provided
if (rev != NULL)
{
// Get item revision tag//API Deprecated
ERROR_CHECK( ITEM_find_rev(itemid,rev, &rev_tag) );
tag_t window = NULLTAG;
tag_t top_line = NULLTAG;

// Create a window for BVR export of this item
ERROR_CHECK( BOM_create_window(&window) );

local_num_tags = 1;
local_tags = (tag_t *) MEM_alloc(sizeof(tag_t) * 1);

local_tags[0] = window;
// Set this item as topline to export
ERROR_CHECK( BOM_set_window_top_line(window,itemTag,rev_tag,NULLTAG,&top_line) );

local_num_tags++;

local_tags = (tag_t *) MEM_realloc (local_tags, sizeof(tag_t) * local_num_tags);

local_tags[local_num_tags-1] = top_line;

}

*n_tags = local_num_tags;
*tags = local_tags;
return ITK_ok;
}

/* Displays help messgage */

static void display_help_message(void)
{

printf( "\n\nsample_plmxml_itk_export: PLMXML export of a simple BVR" );
printf( "\n\nUSAGE: sample_plmxml_itk_export -u=username -p=password -g=groupname
-item=itemname -rev=itemrevision -file=filename");
printf( "\n -h displays this message");
}
Explanation : Important API
  PIE_create_session(&session)
 PIE_session_set_file(session, xmlFileName)
 PIE_session_set_log_file(session, logFileName)
 PIE_find_transfer_mode("ConfiguredDataExportDefault", "", &n_transfer_modes, &transfer_modes)
 PIE_session_set_revision_rule(tSession,tRevRule);
 PIE_session_set_transfer_mode(session, transfer_modes[0])
 PIE_session_export_objects(session, n_objects, objects)

Teamcenter :Manufacturing Process Planner : Create Activity and Assign Form to Activity

Here we will understand how to use manufacturing process planner Teamcneter module for the purpose of creating activity under operation and form under activity.

Please follow the snapshot :


Teamcenter SOA Service : Manufacturing Process Planner : Operation and Activity Creation and Attachment of Activity and Form

Problem Statement : 1) Attach Form Object To Activity OR Activity To RootActivity
//APIs are same only Object provided to APIs are different

How to do this task in Teamcenter ? refer link
1) Attach Form Object to Activity
  Left Object - Activity
  Right Object - Form Object

Assumption here is we have top line of Process under which we have operation ,beneath operation we have activity attached.Add form to that activity.
From top Line we will get Operation Line and from that operation line we will get root activity and from root activity we will get activity to which we want form to be attached.

//Create Form Object
CreateIn[] createIn = new CreateIn[1];
createIn[0] = new CreateIn();
createIn[0].data.stringProps.put( "object_name", "TestRRActivity12302016123" );
createIn[0].data.stringProps.put( "object_desc", "jTestRRActivity12302016 desc123" );
createIn[0].data.boName = "Activity Form";
CreateResponse createObjectsForm = null;

try {

createObjectsForm = dataManagementService1.createObjects( createIn );

} catch (ServiceException e) {

e.printStackTrace();

} // create form object end
//Attach Form Object To Activity

BOMLine operationline3=getchildlines("TCK71000006461/A-TestMeOp1VOption (Engineering)",topLineObject,dataManagementService1);//get Operation line

getAttachmentLines(operationline3, connection);//get Activity to which form is to be attached

MEActivityFolderInfo[] Activityfolderinfo=new MEActivityFolderInfo[1];
Activityfolderinfo[0]=new MEActivityFolderInfo();
Activityfolderinfo[0].activity=activityLineObject;//MEActivity to which we want to attach form
Activityfolderinfo[0].contents=new WorkspaceObject[]{(WorkspaceObject) createObjectsForm.output[0].objects[0]};//Form object<-createObjectsForm.output[0].objects[0]

dataManagementService.createOrUpdateMEActivityFolders(Activityfolderinfo);
 2) Attach Activity To Root Activity Of Operation(i.e What we say in Teamcenter is attach activity to operation but it is actually attached to root activity of operation)
Left Object - RootActivity  of Operation
Right Object - Activity

Assumption here is we have top line of Process under which we have operation under which there is default root activity to which we want to attach activity.
From top Line we will get Operation Line and from that operation line we will get root activity to that root activity we will attach activity.

//Create Activity Object
CreateIn[] createIn2 = new CreateIn[1];
createIn2[0] = new CreateIn();
createIn2[0].data.stringProps.put( "object_name", "Test10" );
createIn2[0].data.stringProps.put( "object_desc", "Test10 desc" );
createIn2[0].data.boName = "MEActivity";
CreateResponse createObjectsActivity= null;

try {

  createObjectsActivity = dataManagementService1.createObjects( createIn2 );

} catch (ServiceException e) {

e.printStackTrace();

} // create Activity object end
//Attach Activity Object To Root Activity
BOMLine operationline3=getchildlines("TCK71000006461/A-TestMeOp1VOption (Engineering)",topLineObject,dataManagementService1);//Get OPeration line
getAttachmentLines(operationline3, connection);//provide root line

MEActivityFolderInfo[] Activityfolderinfo=new MEActivityFolderInfo[1];
Activityfolderinfo[0]=new MEActivityFolderInfo();
Activityfolderinfo[0].activity=rootactivityLineObject;//Root Activity
Activityfolderinfo[0].contents=new WorkspaceObject[]{(WorkspaceObject)createObjectsActivity.output[0].objects[0]}; //MEActivity object

dataManagementService.createOrUpdateMEActivityFolders(Activityfolderinfo);

//Return the child line based on filter

 private BOMLine getchildlines(String filter_formattedtitletext,BOMLine topLineObject,com.teamcenter.services.strong.core.DataManagementService dataManagementService)
 {

  ModelObject[] allChildLines;

  try {

    dataManagementService.getProperties( new ModelObject[] { topLineObject }, new String[]{ "bl_child_lines" } );

   allChildLines = topLineObject.get_bl_child_lines();

  for ( int i = 0; i < allChildLines.length; i++ )
   {

    BOMLine bomLine = (BOMLine) allChildLines[i];
    dataManagementService.getProperties( new ModelObject[] { bomLine }, new String[]{ "bl_formatted_title" } );

    String formated_title = bomLine.get_bl_formatted_title();

    if ( formated_title.equalsIgnoreCase(filter_formattedtitletext))
    {
     return bomLine;
    }
    System.out.println( bomLine.get_bl_formatted_title() );
   }

  } catch (NotLoadedException e) {

   e.printStackTrace();
  }
  return null;
}

//provide Root activity and ActivityLine object
 
MEActivity activityLineObject;
MEActivity rootactivityLineObject;

private void getAttachmentLines( BOMLine bopLine, Connection connection ) throws NotLoadedException
 {
  Mfg0BvrOperation mfg0BVROperation = (Mfg0BvrOperation)bopLine;

  DataManagementService dataManagementService = DataManagementService.getService( connection );
  dataManagementService.getProperties( new ModelObject[] { bopLine }, new String[]{ "bl_me_activity_lines" } );

  CfgActivityLine activityLine = (CfgActivityLine) mfg0BVROperation.get_bl_me_activity_lines();

  dataManagementService.getProperties( new ModelObject[] { activityLine }, new String[]{ "me_cl_object_name","me_cl_object_desc","me_cl_source" } );
  rootactivityLineObject=(MEActivity) activityLine.get_me_cl_source();
  dataManagementService.getProperties( new ModelObject[] { activityLine }, new String[]{ "me_cl_child_lines" } );
  ModelObject[] activityContents = activityLine.get_me_cl_child_lines();

  for ( int i = 0; i < activityContents.length; i++ )
  {
    CfgActivityLine cfgActivityLine =  (CfgActivityLine) activityContents[0];
    dataManagementService.getProperties( new ModelObject[] { cfgActivityLine }, new String[]{ "me_cl_object_name","me_cl_object_desc","me_cl_source" } );
    activityLineObject = (MEActivity) cfgActivityLine.get_me_cl_source();
    System.out.println("Activity Object Name ="+cfgActivityLine.get_me_cl_object_name());
    System.out.println("Activity Object Desc ="+cfgActivityLine.get_me_cl_object_desc());
  }
}

Thursday 29 December 2016

Teamcenter ITK : Exapnd BOM with Revision Rule

Problem Statement :Print BOM recursively using BOM APIs
#include <stdio.h>
#include <string.h>
#include <stdlib.h>
#include "unidefs.h"
#include "mem.h"
#include "tc.h"
#include "tcfile.h"
#include "item.h"
#include "bom.h"
#include "cfm.h"
#include "workspaceobject.h"
#include "tc_string.h"
#include "tcfile.h"
#include "emh.h"
#include "tctype.h"

static void printrecursivebom (tag_t line,tag_t Parent, int depth,char *req_item);
extern int ITK_user_main( int argc, char **argv )
{
        char *Item_ID = ITK_ask_cli_argument("-Item_ID=");
 char **values = (char **) MEM_alloc(1 * sizeof(char *));
 char **attrs = (char **) MEM_alloc(1 * sizeof(char *));

 int ifail;
 int n_tags_found=0;

 tag_t item_tag=null_tag; 
 tag_t window=null_tag; 
 tag_t rule=null_tag; 
 tag_t top_line=null_tag;
 tag_t *tags_found = NULL;

       ifail =ITK_auto_login( );

  if(ifail==ITK_ok)
 {
   printf("\n\n\t Successfully Logged in With INFODBA");
 }
 else
 {
  printf("\n\n\t Login Failed");
 }
 values[0] = (char *)Item_ID;
 attrs[0] ="item_id";  

 ITEM_find_items_by_key_attributes(1,attrs,values, &n_tags_found, &tags_found); //Searching Item tag in Database
       printf("\n\n\tn_tags_found are  --->%d",n_tags_found);

 item_tag = tags_found[0]; //storing Item Tag in item_tag datatype
 MEM_free(tags_found);

 BOM_create_window (&window);  
 CFM_find( "Latest Working", &rule ); //Find Revision Rule 
 BOM_set_window_config_rule( window, rule );//Set Revision Rule 

//Sets a flag to say whether BOM lines are packed by default. By default 
all BOM lines are reported. //If this function is called to set the 
default packing true, then packable lines will be reported as one //BOM 
line.
 BOM_set_window_pack_all (window, true);

 BOM_set_window_top_line (window, item_tag, null_tag, null_tag, &top_line);

 printrecursivebom(top_line,NULLTAG,0,Item_ID);  

return ITK_ok;
}
static void printrecursivebom(tag_t line,tag_t Parent, int depth,char *req_item)
  {
 int n=0;
 int k=0;
 int *   attribute;

 tag_t  *children ;
 tag_t    value;
 
 char    a_name[WSO_name_size_c+1];

 depth ++;

        printf("\n\n\t\t Calling Recursive function to get childrens of Parent Assembly\n");   

  BOM_line_ask_child_lines (line, &n, &children);  
  printf("\n No:of Child Parts are -------->%d\n",n);
  printf("\nDepth value is -------->%d\n",depth);

  for (k = 0; k < n; k++)
  {
  //get the revision from bomline
                BOM_line_look_up_attribute  (  "bl_revision", &attribute  );
                BOM_line_ask_attribute_tag  (  children[k], attribute, &value  );
  WSOM_ask_name  (  value,  a_name);
  printf("\n\n\n ChildName is  :: %s\n",a_name); 
  printf("\n K value is -------->%d\n",k);


  printrecursivebom (children[k],line,depth,req_item);
 }
 printf("\n After Depth value is -------->%d\n",depth);
  }
Explanation : Important API 
ITEM_find_items_by_key_attributes(1,attrs,values, &n_tags_found, &tags_found); 
BOM_create_window (&window); 
CFM_find( "Latest Working", &rule );
BOM_set_window_config_rule( window, rule ); 

BOM_set_window_pack_all (window, true); 
BOM_set_window_top_line (window, item_tag, null_tag, null_tag, &top_line); 
BOM_line_ask_child_lines (line, &n, &children); BOM_line_look_up_attribute ( "bl_revision", &attribute ); BOM_line_ask_attribute_tag ( children[k], attribute, &value ); WSOM_ask_name ( value, a_name);

Teamcenter ITK API :BOM Creation with variant condition

Understnading the BOM creation APIs
 //Create BOM


//Creates a new BOMView
PS_create_bom_view( NULLTAG, "", "", parent_item,&bv );
ifail = AOM_save( bv );
ifail = AOM_save( parent_item );
ifail = AOM_unlock( parent_item );


//Creates an initial working revision of a BOMView, with no occurrences.
ifail = PS_create_bvr( bv, "", "", false, parent_rev,&(parent->bvr) );
ifail = AOM_save( parent->bvr );
ifail = AOM_save( parent_rev );
ifail = AOM_unlock( parent_rev );


//Creates a number of occurrences linking the specified parent BOMView Revision and the child Item
ifail = PS_create_occurrences( parent->bvr, item, NULLTAG,line->no_of_occs, &occs );

//Sets the quantity attribute of an occurrence. A negative quantity means "quantity undefined."
ifail = PS_set_occurrence_qty( parent->bvr, occs[i], qty );

//Sets the sequence number of an occurrence.
PS_set_seq_no( parent->bvr, occs[i],line->seq_no );

ifail = PS_set_occurrence_name( parent->bvr, occs[i],line->occ_name );

//Adds the specified Item or Item Revision as a substitute child for the specified occurrence
ifail = PS_add_substitute( parent->bvr, occs[i],item, NULLTAG );

//We have done creating BOM //But may required to add variant condition on occurrence

//First Create option to define/add variant condition on occurrence 

//Creates a new classic (legacy) option
BOM_new_option( rev,line->options.ids[opt],"",BOM_option_mode_enum,&option,&option_rev,&ve,&veb)
AOM_save(ve)

//Add values to created option
BOM_add_option_rev_value( option_rev,line->options.ids[opt],&thrown_away_index );
if (ITK_ok != AOM_save(option_rev)|| ITK_ok != AOM_save(option)
 || ITK_ok != POM_save_required( rev, &save_required )
 || ( save_required && ( ITK_ok != AOM_save(rev) ) ) )

//Adding variant condition on occurrence

//Creates a new empty clause list. This is used to create a new variant condition
BOM_variant_new_clause_list( window, &clause_list )


//Appends a new clause onto the end of a clause list.
//How this clause is related to its predecessor.
//Must be either BOM_variant_operator_and or BOM_variant_operator_or.
BOM_variant_clause_append ( clause_list,BOM_variant_operator_and,option,
( ( option_eq_s[0] == '=' )? BOM_variant_operator_is_equal: BOM_variant_operator_not_equal ),
option_val_s )

// Create a condition from the clause_list expression
if (ITK_ok != BOM_variant_join_clause_list ( clause_list, &cond_ve )//Creates a new condition Variant Expression from the clause list
|| ITK_ok != BOM_variant_expr_load_if ( cond_ve, &loadif_ve )// Creates a "load if" type Variant Expression which can be attached to a BOM Line (or Occurrence) to control variant configuration of an assembly.
|| ITK_ok != BOM_new_variant_e_block ( &veb )//Returns a newly-created variant expression block
|| ITK_ok != BOM_set_variant_e_block ( veb, 1, &loadif_ve )//Overwrites a variant expression block with new data.
|| ITK_ok != PS_set_variant_data( parent->bvr, occs[i], veb )//Sets the variant condition for the occurrence to the specified variant expression block
|| ITK_ok != AOM_save ( loadif_ve )
|| ITK_ok != AOM_save ( veb )
)

//Deletes a clause list.
ifail = BOM_variant_delete_clause_list ( clause_list );

// Get the occurrences from BOM

//This function will return the tags of all bom views related to the Item.
ITEM_list_bom_views( parent_item, &bv_count, &bvs);

//This function will return the tags of all BOMView revisions for the Item Revision
ITEM_rev_list_bom_view_revs( parent_rev, &bvr_count, &bvrs);

//Lists all of the occurrences of the specified BOMViewRevision.
ifail = PS_list_occurrences_of_bvr( parent->bvr,&n_occs, &occs );

//Deletes the occurrence from its parent BOMView Revision.
ifail = PS_delete_occurrence( parent->bvr, occs[i] );

ifail = AOM_save( parent->bvr );
ifail = AOM_unlock( parent -> bvr );

Teamcenter ITK API : Item /Unit of Meanure

Here we will come to know the few APIs related to ITEM/UOM
ITEM

//Generates a Item ID for a user.
USER_new_item_id(NULLTAG,type_tag,&mod,&id);

line->item_id = id;

ITEM_create_item( line->item_id,line->item_name,line->item_type,NULL,&item,&rev );
ifail = ITEM_save_item( item);

ifail = ITEM_create_rev( item, NULL, &rev );
ifail = ITEM_save_rev( rev);

ifail = ITEM_ask_name (item, name);
ifail = ITEM_set_name (item, line->item_name);
//Need to save the item otherwise item name can not set
ifail = AOM_save(item);

ifail = ITEM_set_rev_name (rev, line->item_rev_name);
//Need to save the item rev otherwise item rev name can not set
ifail = AOM_save(rev);

//This function will get the type of the Item.type ->char array
ITEM_ask_type (item, type);

//This function will return the tag of a specific Item Revision
//If more than one match (case insensitive) is found, an error is returned
ITEM_find_revision( item, default_null_to_A(line->item_revision_id), &rev );

//This function searches the database for all Item Revisions (of the given Item)
ITEM_find_revisions

Unit of Measure

//Units of measure are objects defined for the Teamcenter Engineering site by the system administrator.
//By default, Items have no UOM. In this case this function will give NULLTAG.
//This implies that quantities of such Items are expressed in terms of "Each" or "Pieces".
//In other words they refer to a discrete number of component parts.
//In PSE if no specific quantity value is associated with the use of such Items, the default quantity is assumed to be "1 component".

//Returns the tag of the UOM with the given symbol.
ifail = UOM_find_by_symbol( line->unit_of_measure, &unit_of_measure );

//Sets the unit of measure in which quantities this Item must be expressed.
ifail = ITEM_set_unit_of_measure( item, unit_of_measure);

//Enquires the unit of measure in which quantities of this Item must be expressed
ITEM_ask_unit_of_measure (item, &old_unit_of_measure);

Tuesday 27 December 2016

Teamcenter Rich Client Customization : Overview

Lets give a short and quick overview of Rich client customization.
For better understanding , please read this page once you done with client customization guide PDF.

The client is the user interface (UI) layer and is built and customized using the Java language (rich client) or JavaScript (thin client) and other methods. The server layer can be customized using the Integration Toolkit (ITK) and the C++ programming language.


The rich client is based on Eclipse, your customizations have access to all Eclipse extension points and OSGi services. They can also use Teamcenter-developed customization techniques. To customize the rich client, you can use:

· Base Eclipse extension points and services (for example, the org.eclipse.ui.menus extension point).

· Teamcenter extension points and services (for example, the application extension points).

· Teamcenter customization mechanisms (for example, style sheets).


Within the Teamcenter rich client user interface, application functionality is provided in perspectives and views. Some applications use perspectives and views to arrange how functionality is presented.

You can control the behavior and display of Teamcenter applications in both the rich client and the thin client using options and preferences.

·         Preferences are configuration variables stored in a Teamcenter database that are read when a Teamcenter session is initiated.
·         Options are preferences presented in the rich client by category
The Teamcenter rich client is hosted within the Eclipse rich client platform (RCP) framework. The RCP is a general purpose application framework which provides strong support for modular and extensible component-based development through the use of plug-ins.
Following are some of the basic tasks you perform during client customizations:
·         Change the layout of pages in both the rich client and thin client using style sheets.
For more information, see Using style sheets.
·         Set up your environment to perform rich client-only customizations.
For more information, see Enable rich client customization.
·         Override Teamcenter commands.
For more information, see Suppressing menu commands.
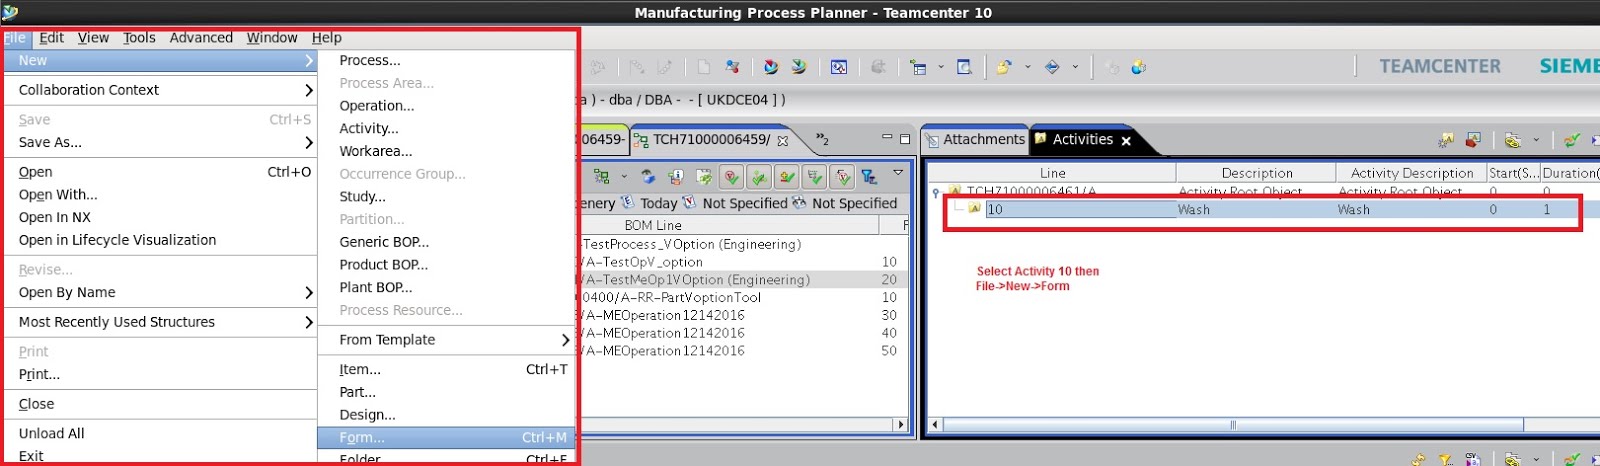
·         Create custom forms on the rich client.
For more information, see Methods of form customization.
·         Add a command to a menu on the rich client.
Style sheets are the easiest way to codelessly customize the rich client and thin client. You can customize the display by editing the style sheet. The advantages are:
·         You can customize using configuration instead of coding.
·         The customization affects both the rich client and thin client.
The three parts to the MVC paradigm are:
·         Command
·         Menu contributions
·         Handler
·          
Command has a globally unique ID and represents the abstract semantic concept of a behavior, such as copy, paste, and save. A command is not the implementation of that behavior nor is it the visual representation of that behavior.
<command id="com.teamcenter.rac.command"
     name="%com.teamcenter.rac.command.name">
</command>
Menu contributions represent a particular view or visual representation of a command. The menu contributions create the menu and toolbar structures and insert them into the correct Eclipse location. The location is specified as an Uniform Resource Identifier (URI) and can be any one of the following:
·         Main menu
·         Main toolbar
·         View toolbar
·         View menu
·         Context (popup) menu
·         Trim area

The menu contribution can define a menu label, mnemonic, or icon. It contains visual references to already defined commands.
The menu contribution can define when it will be visible with a visibleWhen clause. The visibleWhen clause refers to all standard Eclipse expressions. This expression can be very simple or very complex and evaluates to either true or false which determines whether a menu is visible or not.
<menuContribution locationURI="menu:org.eclipse.ui.main.menu">
   <menu id="file" label="%menu.file.label" mnemonic="%menu.file.mnemonic">
      <command commandId="org.eclipse.ui.file.refresh"
                mnemonic="%command.refresh.mnemonic"
                style="push">
      </command>
      <separator name="sep1" visible="true"/>
      <command commandId="org.eclipse.ui.file.exit"
                mnemonic="%command.exit.mnemonic"
                style="push">       </command>    </menu> </menuContribution>
A handler implements one particular behavior for a given command. For any given command, there can be zero or several handlers defined. However only none or one handler may be active for a given command. The active handler controls the command’s enabled state.
Handlers most commonly extend the AbstractHandler class
Handlers are provided an application context in their execute(*) method
If a command has no active handlers defined, any menu contributions defined for a command are not visible
The handler can be declaratively activated via the ActiveWhen clause or programmatically activated.
There are two different methods you use to distribute rich client customizations, depending if the rich client is a two-tier or four-tier client.
·         For four-tier clients, use a solution file and the Web Application Manager (insweb).
.
For two-tier clients, use Teamcenter Environment Manager (TEM) Updates Manager.
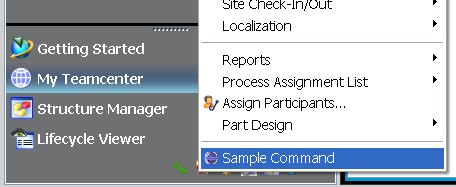
·         to place the menu command at the bottom of the Tools menu. Replace the entire contents of the plugin.xml file with the following code:

<?xml version="1.0" encoding="UTF-8"?> <?eclipse version="3.6"?> <plugin> <extension point="org.eclipse.ui.commands">
·               <command
·                  name="Sample Command"
·                  id="com.mycom.addmenuitem.commands.sampleCommand">
·               </command>
·            </extension>
·            <extension point="org.eclipse.ui.handlers">
·               <handler
·                  commandId="com.mycom.addmenuitem.commands.sampleCommand"
·                  class="com.mycom.addmenuitem.handlers.SampleHandler">
·               </handler>
·            </extension>
·            <extension point="org.eclipse.ui.menus">
·               <menuContribution locationURI="menu:tools?after=additions">
·                  <command
·                     commandId="com.mycom.addmenuitem.commands.sampleCommand"
            mnemonic="S"
·                     icon="icons/sample.gif"
·                     id="com.mycom.addmenuitem.menus.sampleCommand">
·                     <visibleWhen>
               <reference
                  definitionId="com.teamcenter.rac.ui.inMainPerspective">
               </reference>
·                     </visibleWhen>
         </command>
·               </menuContribution>
   </extension>
</plugin>

The visibleWhen clause uses the com.teamcenter.rac.ui.inMainPerspective definition to control visibility. This definition is in the com.teamcenter.rac.common plug-in's plugin.xml file. Each Teamcenter perspective has an inMainPerspective definition, usually in the plug-in's plugin.xml file.
For example, the inMainPerspective definition for Structure Manager is in the plugin.xml file in the com.teamcenter.rac.pse plug-in. If you want the menu command to be visible in Structure Manager, change the visibleWhen clause to the following:

<visibleWhen>
   <reference
      definitionId="com.teamcenter.rac.pse.inMainPerspective">
   </reference>
</visibleWhen>
to place the menu command on the shortcut menu
<menuContribution 
         locationURI="popup:org.eclipse.ui.popup.any?after=additions">
 
To place the button on the My Teamcenter toolbar
<menuContribution 
         locationURI="toolbar:navigator_Toolbar?after=additions">
 

Each Teamcenter perspective has its own toolbar. 
For example, the My Teamcenter toolbar is navigator_Toolbar, and 
the Structure Manager toolbar is pse_Toolbar. 
The toolbar is usually defined in the plugin.xml file for the perspective. 
For example, the pse_Toolbar is defined in the plugin.xml file in the com.teamcenter.rac.pse plug-in.
That means if we want to go for any module then we can check its plugin.xml file to have its toolbar id ,menu perspective id  to use .


<menuContribution
            locationURI="menu:com.teamcenter.rac.ui.views.DetailsView?after=group4">
         <menu
               id="closeMenu"
               label="Close">
            <command
                  commandId="com.mycom.exitcommand.command1.Exit"
                  label="Exit"
                  style="push"
                  tooltip="Exit the application">
            </command>
         </menu>
      </menuContribution>


<menuContribution
            locationURI="toolbar:com.teamcenter.rac.ui.views.DetailsView">
         <toolbar
               id="com.mycom.exitcommand.toolbar1">
            <command
                  commandId="com.mycom.exitcommand.command1.Exit"
                  icon="icons/sample.gif"
                  label="Exit"
                  style="push"
                  tooltip="Exit the application">
            </command>
         </toolbar>

Add a toggle menu item:
<command
            categoryId="com.mycom.toggle.commands.category"
            defaultHandler="com.mycom.toggle.handlers.ToggleInfoHandler"
            id="com.mycom.toggle.commands.infoCommand"
            name="Info">
         <state
               class="org.eclipse.ui.handlers.RegistryToggleState:true"
               id="org.eclipse.ui.commands.toggleState">
         </state>
State element specify that I am toggle command 

IMP Note:
If you make changes to any of the .properties files, or you add new plug-ins or change plug-in content, you must run the genregxml script to ensure your changes are included when the rich client starts. This enhances performance because it caches the properties so they can be loaded at startup.
(location :TC_ROOT\portal\registry\genregxml)


Add a view to the rich client:
Important things to add custom view is
Plugin.xml include below statement
 
<extension point="org.eclipse.ui.views">
      <view
         name="MyCom Custom View"
         class="com.mycom.customview.views.CustomView"
         id="com.mycom.customview.views.CustomView">
      </view>
   </extension>
 
Class indicates that specified class will create View 
 
Create  class and that class must extends ViewPart class and override createPartControl
Method
 
Format :
 
public void createPartControl(Composite parent) {
               parent.setLayout( new FillLayout() );
               Text t = new Text( parent, SWT.BORDER );
 
 
}
 
We can say parent is our frame on which we add element .
View appears in Window→Show View→Other→Other→MyCom Custom View.
 
Add a new rich client application:i.e
Adding Application like my teamcenter(if wanted to  appear just below it or in  navigation view then  disply mode is primary else display mode secondary and need to select from available application like workflowdesigner available. )

Plugin.xml must contain
<extension point=”com.teamcenter.rac.aifrcp.appliation”>
<aif_app_item
                        Displaymode=”primary”
        groupName="Mycompany"
        icon="icons/defaultapplication_32.png"
        id="com.mycom.customapp"
        name="Custom Application"
        ordinality="200"
        perspective_id="com.mycom.customapp.perspectives.CustomPerspective"
        session="com.teamcenter.rac.kernel.TCSession"
        tooltip="Custom Application"/> 
 
<extension point="org.eclipse.ui.perspectives">
      <perspective
        class="com.mycom.customapp.perspectives.CustomPerspective"
        icon="icons/defaultapplication_16.png"
        id="com.mycom.customapp.perspectives.CustomPerspective"
        name="Custom Application"/>
   </extension>
 
<extension point="org.eclipse.ui.perspectiveExtensions">
      <perspectiveExtension targetID="*">
         <perspectiveShortcut 
         id="com.mycom.sendtoapp.perspectives.CustomPerspective" />
      </perspectiveExtension>
   </extension>
 
   <extension point="org.eclipse.ui.views">
      <view
         allowMultiple="false"
         class="com.mycom.customapp.views.CustomView"
         icon="icons/pview.gif"
         id="com.mycom.customapp.views.CustomView"
         name="Custom View"/>
   </extension>
 
When application is loaded perspective i.e CustomPerspective will get called and in that perspective we have added view so viewcode i.e CustomView  will get called.
 
Specifying a perspectiveShortcut indicates that another perspective (specified by id) should be added to the command linkWindow > Open Perspective... menu of the target perspective
 
 
public class CustomPerspective implements IPerspectiveFactory {
 
public void createInitialLayout(IPageLayout layout) { // IPageLayout interface 
               // TODO Auto-generated method stub
        layout.setEditorAreaVisible(false);
        String editorArea = layout.getEditorArea();
        IFolderLayout top = layout.createFolder("top", IPageLayout.TOP, -2f, 
         editorArea);
        top.addView( "com.mycom.customapp.views.CustomView" );
        }
 
A page layout defines the initial layout for a perspective within a page in a workbench window.
This interface (IPageLayout interface) is not intended to be implemented by clients.
When a perspective is opened, it creates a new page layout with a single editor area. This layout is then passed to the perspective factory createInitialLayout(IPageLayout). where additional views and other content can be added, using the existing editor area as the initial point of reference.
createFolder(id, relationship,ration,referenacepart)
 
CustomView will be 
public class CustomView extends ViewPart {
        
        public CustomView() {
               super();
        }
        @Override
        public void createPartControl(Composite parent) {
 
        // add text or component  to parent etc .
}


Add an application to the Teamcenter Send To menu
Command :
<extension point="org.eclipse.ui.commandImages">
      <command
         icon="icons/defaultapplication_16.png"
         id="com.mycom.sendtoapp.sendto">
      </command>
   </extension>
 
Menu :
<extension point="org.eclipse.ui.menus">
      <menuContribution 
         locationURI="popup:com.teamcenter.rac.sendto?after=additions">
         <command
               commandId="com.mycom.sendtoapp.sendto">
 
 
Handler :
 
<extension point="org.eclipse.ui.handlers">
      <handler
         commandId="com.mycom.sendtoapp.sendto"
  class="com.teamcenter.rac.common.handlers.SendToHandler:com.mycom.sendtoapp.perspectives.CustomPerspective">
         <enabledWhen>
            <iterate ifEmpty="false">
               <reference definitionId="com.mycom.sendtoapp.sendToActive"/>
            </iterate>
         </enabledWhen>
      </handler>


See handler is teamcenter handler which will handle the request and we have provided to it our perspective as value i.e object selected is send to our perspective 
 
Create our own perspective and View as created before
The SendToHandler handler takes the perspective ID to open as an argument.
 
The SendToHandler handler shows the specified perspective, gets the registered OpenService (registered in activator setupServices () method)service, then calls the OpenService.open() method.
 
Activator.java 
 
protected void setupServices(BundleContext context) {
               // TODO Auto-generated method stub
       
 Dictionary<String, String> properties = new java.util.Hashtable<String, String>();
        // Register the open service
        properties.put( IServiceConstants.PERSPECTIVE,
                       "com.mycom.sendtoapp.perspectives.CustomPerspective" );//perspective id
        CustomOpenService customOpenService = new CustomOpenService();

        context.registerService( IOpenService.class.getName(),
                customOpenService, properties );
               
        }
 
Openservice  which we have registerd above :
  public class CustomOpenService implements IOpenService {
        @Override
        public boolean close() throws Exception {
               // TODO Auto-generated method stub
               return false;
        }
        @Override
        public boolean open(final InterfaceAIFComponent cmp) {
               Display.getDefault().asyncExec( new Runnable() {
                       public void run() {
                               IWorkbenchWindow window = PlatformUI.getWorkbench()
                                              .getActiveWorkbenchWindow();
                               MessageDialog
                                              .openInformation(window.getShell(),
                                                             "CustomOpenService",
                                                             "You sent this component to the SendTo Application: "
                                                                            + cmp.toString());
                       }
               });
               return false;
        }
        @Override
        public boolean open(InterfaceAIFComponent[] cmps) {
               // TODO Auto-generated method stub
               return false;
        }
}


Override Teamcenter commands
<extension
         point="org.eclipse.ui.handlers">
      <handler
            commandId="com.teamcenter.rac.newItem"   // THIS ID IS id OF NEW ITEM option  WHICH WE have IN TEAMCNTER
            class="com.mycom.myitem.handlers.MyItemHandler">  //AND PROVIDED OUR HANDLER SO IT wil get executed WHEN NEW ITEM IS CREATED


Workbench Core Expressions:
Core expressions are used declaratively in the plugin.xml files, and programmatically with some of the services provided in the workbench.

Declarative Expression Examples

  1. Basic IStructuredSelection
  2. IResources and the Package or Project Explorer
  3. Active Contexts
  4. Active Views and Editor
  5. ActionSets and Contexts

Basic IStructuredSelection

Most of the tree or table like viewers return an IStructuredSelection. For example, the Project Explorer and Package Explorer. When using the default variable you must treat it as an java.util.Collection. That means using <count> or <iterate> Ex. The expression below returns true if all of the selected items are Person.
<enabledWhen>
    <iterate ifEmpty="false">
        <instanceof value="org.eclipse.ui.examples.contributions.model.Person"/>
    </iterate>
</enabledWhen>
This is equivalent to:
<enabledWhen>
    <with variable="selection">
        <iterate ifEmpty="false">

            <instanceof value="org.eclipse.ui.examples.contributions.model.Person"/>
        </iterate>
    </with>
</enabledWhen>
 
The behaviour of iterate is:
  • iterate ands the results of evaluating its child expressions for each element in the collection, unless you set the operator attribute.
  • Default operator is and.
  • iterate with an operator of and returns true if the collection is empty, unless you set the ifEmpty attribute.
Ex.  If you want to be enabled if only one Person is selected, you can include a count element.
<enabledWhen>
    <with variable="selection">
        <count value="1"/>
        <iterate ifEmpty="false">
            <instanceof value="org.eclipse.ui.examples.contributions.model.Person"/>
        </iterate>
    </with>
</enabledWhen>
The same expression using the default variable:
<enabledWhen>
    <and>
        <count value="1"/>
        <iterate ifEmpty="false">
            <instanceof value="org.eclipse.ui.examples.contributions.model.Person"/>
        </iterate>
    </and>
</enabledWhen>

Resources and the Package or Project Explorer

The Package Explorer is a mixture of org.eclipse.core.resources.IResource, org.eclipse.jdt.core.IJavaElement and other classes.
Ex. If you are trying to find all of the "*.java" files, you would need to:
  1. Iterate through the default variable.
  2. Adapt the selection elements to your class, in this case org.eclipse.core.resources.IResource.
  3. Use one of the org.eclipse.core.resources property testers to test the org.eclipse.core.resources.IResource property.
<enabledWhen>
   <with variable="selection">
       <iterate ifEmpty="false">
        <adapt type="org.eclipse.core.resources.IResource">
           <test property="org.eclipse.core.resources.name"
      value="*.java"/>
        </adapt>
     </iterate>
   </with>
</enabledWhen>
When working with the current selection and property testers it does not always make sense to use adapt. In these situations it is a good practice to check that the object under test is a valid type for that property tester:
<enabledWhen>
    <with variable="selection">
        <iterate ifEmpty="false">
            <instanceof type="org.eclipse.core.resources.IResource"/>
            <test property="org.eclipse.core.resources.name"
                     value="*.java"/>
        </iterate>
    </with>
</enabledWhen>

Active Contexts

If your handler should be enabled when your view or editor activates a context, you can use the activeContexts variable. Contexts are defined in the org.eclipse.ui.contexts extension point and activated programmatically using the org.eclipse.ui.contexts.IContextService.
<enabledWhen>
    <with variable="activeContexts">
        <iterate ifEmpty="false" operator="or">
            <equals value="org.example.view.context"/>
        </iterate>
    </with>
</enabledWhen>
 
Note: activeContexts is a collection of the active context IDs as strings.

Active Views and Editor

For handlers that are to be contributed to a specific view or editor, you can use activeEditorId and activePartId in the activeWhen clause. This is an example for a handler that should be active in text editors:
<activeWhen>
    <with variable="activeEditorId">
        <equals value="org.eclipse.ui.DefaultTextEditor"/>
    </with>
</activeWhen>
The following clause is for a handler that's active while in the Project Explorer:
<activeWhen>
    <with variable="activePartId">
        <equals value="org.eclipse.ui.navigator.ProjectExplorer"/>
    </with>
</activeWhen>

ActionSets and Contexts

As of 3.3 all org.eclipse.ui.actionSets (Deprecated)

Variables Provided in the Workbench :  http://wiki.eclipse.org/Command_Core_Expressions

Condition for handler is defined using  activewhen and enabledwhen clause:  i.e when the handler  should execute the behaviour of the command.
 
<extension
 point="org.eclipse.ui.handlers">
 <handler
  commandId="commandId"
  class="org.eclipse.compare.Command">
 
  <activeWhen>
   <with variable="selection"> //The variables used for command framework evaluation are //listed in ISources.java file org.eclipse.ui.ISources
                               //represent The current global selection.
    <count value="1" />
    <iterate operator="and">
     <adapt type="org.eclipse.core.resources.IResource" />
    </iterate>
//This element is used to iterate over a variable that is of type java.util.Collection, or a variable that adapts to //org.eclipse.core.expressions.IIterable. If the object in focus is not one of the above then a CoreException with an //ExpressionStatus will be thrown while evaluating the expression. The child expressions of an iterate expression are //combined using the "and" operator.
//operator - either "and" or "or".
//ifEmpty - the value returned from the "iterate" expression if the collection is empty.

   </with>
  </activeWhen>
 
 </handler>
 <handler
  commandId="other.commandId"
  class="org.eclipse.ui.TalkToMe">
  <activeWhen>
   <with variable="activePartId"> // The ID of the currently active part.
    <equals value="org.eclipse.ui.views.SampleView"/>
   </with>
  </activeWhen>
 </handler>
</extension>
<extension
 point="org.eclipse.ui.handlers">
 <handler
  commandId="commandId"
  class="org.eclipse.Handler">
  <enabledWhen>
   <with variable="activeContexts"> //activeContexts is collection so iterate to check for         context
     <iterator operator="or">
       <equals value="org.eclipse.ui.contexts.window"/>
     </iterator>
   </with>
  </enabledWhen>
 </handler>
</extension>


Localize your customizations:
Add the following line to the end of the MANIFEST.MF file:
Bundle-Localization: plugin
 
All the static value like name of command and label etc will be taken from plugin.properties file
at the same level as the plugin.xml file.using file->new file
Add the following name/value pairs to the 
 
plugin.properties file:
 
myMenuitem.label=My Hello world
myTooltip.tip=My Say hello world
myCommand.name=My Command
 
Add a Spanish localization by creating a 
plugin_es.properties:
 
myMenuitem.label=Mi Hola mundo
myTooltip.tip=Mi para Decir hola mundo
myCommand.name=Mi Orden
 
Edit the plugin.xml file replacing hard coded values with %keyname for the name/value pairs you typed in the plugin.properties file. For example:
label="%myMenuitem.label"
 
<command
         name="%myCommand.name"
         categoryId="com.mycom.l10n.commands.category"
         id="com.mycom.l10n.commands.sampleCommand">
      </command>
 
<menu
            label="%myMenuitem.label"
            mnemonic="M"
 
Verify the customization thus far.
a.       Create a new configuration for the Spanish locale by choosing Run→Run Configurations (or Run→Debug Configurations) and specifying -nl es instead of -nl ${target.nl} on the Arguments tab. For example:
-os ${target.os} -ws ${target.ws} -arch ${target.arch} -nl es
 
We have modified a label command name to display in Spanish but how the message displayed in handler be modified to display in Spanish or other locale.

Localize the message.
a.       In Eclipse, choose Handler in which we have message and then Source→Externalize Strings.
Sample Handler
public class SampleHandler extends AbstractHandler {
       /**
        * The constructor.
        */
       public SampleHandler() {
       }
       /**
        * the command has been executed, so extract extract the needed information
        * from the application context.
        */
public Object execute(ExecutionEvent event) throws ExecutionException {
IWorkbenchWindow window = HandlerUtil.getActiveWorkbenchWindowChecked(event);
MessageDialog.openInformation(window.getShell(),"TestProject","Hello,Eclipse world");
  return null;
}
}
This creates the Messages.java and messages.properties
Content of messages.properties  :

SampleHandler_0=TestProject
SampleHandler_1=Hello, Eclipse world
b.  Now Again Select Handler and then Source→Externalize Strings
Customize the rich client properties files:
·  Open WinZip, navigate to the TC_ROOT\portal\plugins directory, and open the JAR file that contains the properties file you want to override. The file name has the form property.properties. For example, to override the mpp.properties file, open the com.teamcenter.rac.cme.legacy.jar file.
·  Extract the properties file you want to
override from the JAR file. For example, extract the mpp.properties file.
·  In a text editor, open the properties file to
determine the syntax of the property you want to modify.
· Create a new property_user.properties in a text editor. For example, if you
open the mpp.properties file, create the mpp_user.properties file.
Update the project tabs.
open plugin.xml
Select the com.teamcenter.rac.util.tc_properties extension point.
Click the plugin.xml tab. Type text in the file so it
looks like the following:
<?xml version="1.0" encoding="UTF-8"?>
<?eclipse version="3.6"?>
<plugin>
   <extension
          point="com.teamcenter.rac.util.tc_properties">
   </extension>
</plugin>
Create a package.
a.       In the Package Explorer view, right-click your project and choose New→Package.
b.      In the Name box, type the path name where the properties file was originally. For example, if you originally extracted the mpp.properties file, the package name should be com.teamcenter.rac.cme.mpp.
c.       Click the MANIFEST.MF tab and type your new package at the end of the Export-Package line. For example, if your project name is com.mycom.propertiesfile and the new package is called com.teamcenter.rac.cme.mpp, the line should read:

d.  Export-Package: com.mycom.propertiesfile, com.teamcenter.rac.cme.mpp
Developing forms using JavaBeans
You can create a custom Java panel (JPanel) assigned to a custom business object and display the properties using JavaBeans.
when a user selects a custom ItemRevision business object and chooses the Viewer view or View→Properties,
the custom panel is displayed.
Panel rendering is registered to the business object by placing the following command into a custom stylesheet_user.properties file:
Syntax: custom-business-object-name.JAVARENDERING=package-name.custom-java-panel-name
A)
1.      Create a custom item business object.
2.     In the Business Objects view, open the item revision business object (for example, A4_MyItemRevision), click the Properties tab, and create the custom persistent properties you want to display in the panel,
3.      Set the Enabled property constant to True for each of the new properties
4.      Deploy the custom template
B)
1.      Create the Eclipse project.
2.      Update the Dependencies tab.
3.      Update the Extensions tab.
Click the Add button.
Select the com.teamcenter.rac.util.tc_properties extension point
4.      choose New→Package.
5.      In the Name box, type com.teamcenter.rac.stylesheet
6.      Right-click the com.teamcenter.rac.stylesheet package and choose New→File. In the File Name box, type CustomSamplePanel.java and click Finish
7.      Open the project’s Runtime tab, click the Add button, and add the com.teamcenter.rac.stylesheet package.
8.      Open the CustomSamplePanel.java file and enter the code: of Property to be displayed
                       Ex: JPanel jPanel1 = new JPanel();
              jPanel1.setLayout( new PropertyLayout() );
               jPanel1.setOpaque( false );
               JLabel jLabel1 = new JLabel("Test double");
                       PropertyTextField doubleTextField = new PropertyTextField();
                 doubleTextField.setProperty( "a4_MyDouble" );//This statement will get the value from database to rendere in Our Panel as a4_MyDouble is Property name in BMIDE
9.      Right-click the com.teamcenter.rac.stylesheet
package and choose New→File. In the File Name box, type stylesheet_user.properties and click Finish.
This file adds content to the stylesheet.properties file. The _user name in the file indicates that this is a custom file provided by a user.
 Open the stylesheet_user.properties file and enter the following line:
A5_MyItemRevision.JAVARENDERING=com.teamcenter.rac.stylesheet.CustomSamplePanel
  This setting will render the Property based
on CustomPanel code provided we have set the preference in Rich CLient
In the rich client, create a preference for this rendering. Choose Edit→Options→Index→New and in the Name box type A4_MyItemRevision.JAVARENDERING and in the Values box, type com.teamcenter.rac.stylesheet.CustomSamplePanel.
Deploy Project and check:
Select Item revision of custom Item and then View properties
v  The base component for a rich client form is a JPanel component that provides flexibility for the placement of forms within different parent containers